The Beads of a Showgirl: Making Friendship Bracelets Ready to Take Center-Stage
The Life of a Showgirl
It's no secret that WSW's Studio Manager, Sandra, is the HSIC (Head Swiftie in Charge) around here. As a lover of pop music and boppy beats, she joined the Swiftie-dom during the 1989 era and hasn't looked back since. Since Taylor Swift's last era, we've added a couple more Swifties to our team, and we're more bejeweled than ever!
Our Swifties take turns jamming out to everyone's favorite era on the studio speakers and with 11 options currently in rotation, the playlist never goes out of style. Some days we're down bad crying at the gym, other days we're feeling 22, & sometimes we're dancing with our hands tied. It's safe to say that around here, there's no bad blood about adding a 12th era to the lineup!
We Can Still Make the Whole Place ✨SHIMMER✨...
In anticipation of release day, Team WSW is stepping into our glittering ✨Showgirl Era✨ and making friendship bracelets by the armful! While we bead, it's enchanting to dream about the Life of a Showgirl, wondering which lyrics we'll relate to and how they'll fold into our own life & love stories.
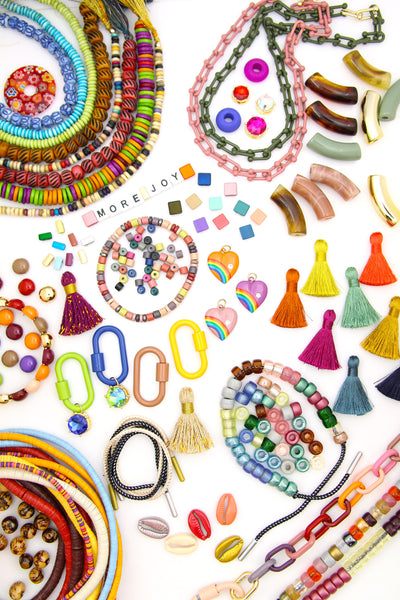
As Taylor Swift said recently, “You should think of your energy as if it’s expensive - as if it’s a luxury item." Backstage at WSW, our team has taken that advice to heart, and we've been choosing to spend our energy focusing on creativity. We've rounded up jewelry, beads, and DIY supplies inspired by the glittering stage lights and glam vibes: gold-flake bangles, glitzy metallics, bold focal beads, and luminous hues of shimmering opalite and Portofino orange. These treasures are truly made for showgirls who love to shine.
Take center stage with the Showgirl Era Collection and design your own jewelry, glittery creations, and show-stopping accessory combos, to make the whole place SHIMMER!

The Beads of a Showgirl:
How to Make the Friendship Bracelets
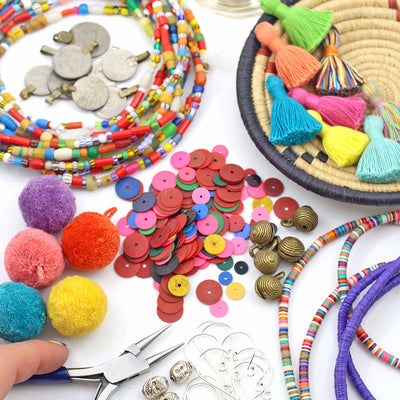
- Gather Supplies
beads • elastic cord • beading needles • threader • scissors
Optional: hypo-cement • tape -
Choose a Color Story/ Vibe.
Decide whether you want to focus on a pattern or spell out a word.
-
Cut Elastic
Cut an 18-20" piece of elastic. We recommend doubling the elastic over itself for maximum durability.
-
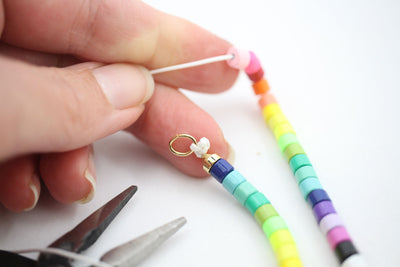
Thread the Needle
Use the threader to thread the elastic onto the needle.
Pro Tip: I like to put a piece of Scotch tape or washi tape on the end of my elastic so that the beads don't spill off the end.
-
String & Measure
String beads onto the needle, then onto the elastic. If you're using letter beads, place them first to ensure correct spacing.
Pause & measure every so often to check the length* of the bracelet.
* Adult average: 7.25-7.5"
* Kids average: 6”
Wrap a string around the wrist, then measure it against a ruler for the best fit
-
Test the Fit
You want it to be comfortably snug (the elastic will stretch).
-
Tie & Knot
Tie the ends into a square knot.
To do this, take the right side of elastic, loop it over and through the left side, then pull. Repeat the same step with the left side. The knot should go right over left, then left over right.
As you tighten, gently stretch the beads so the knot sits snugly between them. Lightly pre-stretch the bracelet to reduce future gaps.
-
Glue (Optional)
Add a dab of G.S. Hypo Cement Glue to the knot. Let it dry briefly.
*Our elastic is "grippy" & doesn't require this, but it's great insurance.
We love this glue because it's sturdy, but it also has a needle applicator, making it easy to get it in tiny spots right where it's needed.
- Trim & Enjoy
Trim off excess elastic & voilà! You have a new bracelet, fresh from your bracelet-making era! -
Repeat
Repeat steps 1-9 for your next 100+ beaded bracelets.
(Trust us, you won't stop at one. 😉)
Whether you’re stacking for concert night, gifting to your besties, or channeling your inner showgirl at home, these bracelets are tiny time capsules of color and connection.
Share your creations with #myWSW or tag @WomanShopsWorld so we can cheer you on from backstage!


Leave a comment