How to Make a Beaded Mask Necklace Chain or Sunglass Strap
Have a mask that needs some to be accessorized? Of course you do; a mask without bling is so last month.
We've got the perfect pandemic DIY kit for you! Make your own beaded mask necklace that can double as a sunglass chain, and as a choker.
Or, use fewer beads and make a matching bracelet.
Get the kit here.
And once your get your kit in hand, here's how you make the most colorful mask strap in town:
- Lay out all kit contents so you can get everything situated.

- There are 2 options for stringing the beads: with a needle, or without. Find the end of the thread and decide which method you would like to use below.
With needle: Use a lighter to slightly warm the last 1-2" of the cord. The cord is waxed, so if you run it through the upper part of the flame, it will melt the wax. Heat it and roll it through your fingers to flatten it. The idea is to get the tip melted and strong enough that you can use it like a needle. Once you have heated it a few times, flatten it with your pliers until you can fit it through the beads. It might take a few times to get it strong and thin enough.
Watch the video tutorial here:
With Needle: Use lighter to slightly warm the last 1/2" of the cord, and pinch it with your fingers. Use pliers to flatten the tip, and then thread the needle. It might take a few tries to get it thin and skinny enough to go through.
Watch the video tutorial here:
- Once you have your thread tip or needle ready, it's time to string some beads! If you have a particular color pattern in mind, it's best to organize your beads before you start stringing.
Start with the tapered end bead. Keep stringing on beads until your mask necklace is the desired length. This kit has enough beads to make a 32" long strap. If you'd like, you could also make a 25" long strap and have enough beads left to make a bracelet! - Once your necklace is long enough, string on the remaining tapered end bead. At this point it's helpful to cut off the excess cord. You have plenty of cord, so leave yourself enough room to work; I reccomend leaving about 10" on each end. Tie a knot at one end of the beads.

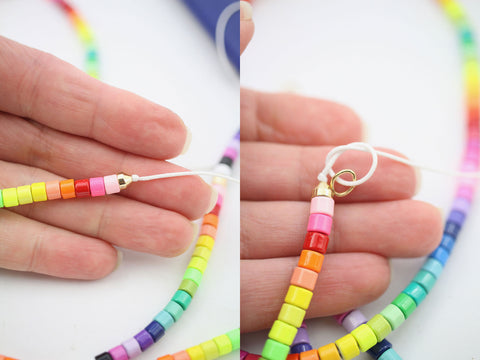
- String cord through a jump ring and then tie another knot around the jump ring, snug against the previous knot.

Trim the excess cord and use a lighter to gently melt the wax in the cord. Squeeze the knot to melt the fibers together. Do this a few times to make sure that the knot isn't going to come undone.
- Now it's time to close off the other end. Make sure the beads are all situated tightly on the cord and that you have strung on the remaining tapered end bead. Tie a knot snug against the last bead. Then string on a jump ring and tie a knot so that the jump ring is right against the last bead, like you did on the other side.

- Open a jump ring using the pliers provided in your kit. Hold the jump ring with the pliers in your left hand, with the split facing up. Grab the right side with your fingers or another set of pliers, and move the right side up, while moving the left side down. You don't want to just stretch open the circle, as it will be very difficult to get the two sides to align again.

- Slide the mask clip onto the open jump ring, as well as the eyeglass holder.

Gently close your jump ring using the opposite motion from what you used to open it. Make sure that both sides of the jump ring meet and are flush together. - Repeat this step on the other side.
Now you're ready to clip your chain to your mask or your sunglasses and spread rainbows!
If you have any questions or need assistance, feel free to leave a comment below, or email us.
Get your Mask Necklace DIY Kit here:


Leave a comment