DIY Beaded Word Bracelet How-To from WSW x TNTP
DIY Beaded Word Bracelets
Some people take a lifetime to find their true calling, and some find it at a young age. I fell in love with beads when I was a toddler, and the obsession hasn't left me since.
I'm the kind of person who wears whatever I want, no matter the current style, but I was so excited to see that beads made a MAJOR comeback in the fashions this year! Wrists everywhere are adorned with colorful creations featuring beads of all sorts — but out of all the bright kitschy baubles: disc beads, pearls, and letter beads have stood out to me as arm party showstoppers.
Enter my tassel, pom pom, and bead-loving pal Marisa over at The Neon Tea Party! Over the years, Marisa and I have brought you a number of fun and easy DIYs, but this time we’re bringing you something extra special: a DIY Beaded Bracelet Kit filled with everything you need to create on-trend additions to your bracelet stack!
In this post, you’ll learn how to put this special DIY kit to use to create a beaded word bracelets with an adjustable closure on the underside. The project is simple yet totally impressive, not to mention the bracelets are so comfortable and durable, I’ll bet you end up living in them.
You can adjust the DIY steps to include any beads you like. You can also lengthen the string and add more beads to create an anklet, choker, or necklace -- the design is completely up to you.
Now, without further ado, let’s dive into how to make Adjustable Beaded Word Bracelets!
YOU’LL NEED
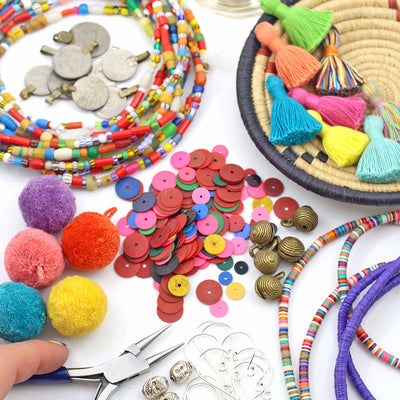
- WSW x TNTP Beaded Word Bracelet DIY Kit, which contains:
- African Vinyl Disk Beads
- Freshwater Pearl Beads
- Brass Spacer Beads
- 12 Plastic Letter Beads
- Black knotting cord
- Beading Needle
- Needle Threader
- Tapestry Needle
- Tape measure
- Scissors
- Washi tape
- Lighter
- Tray or bead board

INSTRUCTIONS
STEP 1: Plan out your pattern
Your bracelet should have about 5.5-6.5” of beads, depending on the size of your wrist. When creating a word or name bracelet, you’ll of course want whatever you’re spelling out to be centered. Lay out your letters centered on a bead board or tray. Next add pearls and spacer beads to your layout wherever you want them to live in your overall pattern. Last are your vinyl disk beads. Since those can’t stand up on their own, no need to put them in your layout - you can add those as you’re beading and measure them as you go. You can, however, plan out your color pattern to prep for beading!

STEP 2: Prep your cord
Cut 24” of cord for a bracelet, then cut it into two equal parts - 12” each. Set one 12” strand aside for later. Tear a small piece of washi tape and fold it in half around the end of the other 12” strand to catch the beads. Thread the non-taped end of the cord onto a beading needle, using needle threader if needed.

STEP 3: String your beads
Start by stringing on your center beads - presumably the letters. You want to start in the middle and build out one half of your bracelet until it reaches half length (or slightly longer than half, depending how long your word is), then add a piece of washi tape to the end of the finished side, remove the washi tape from the unbeaded side, and string the rest of your beads.
To string beads, place the beads directly onto the beading needle attached your cord. You can put a bunch of beads on the needle at once, which make this process a lot faster. Once the beads are on the needle, push them down until they transfer onto the cord.

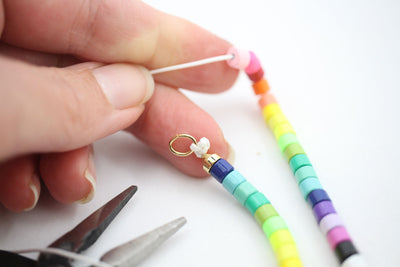
STEP 4: Add knots to keep beads in the center
Once all of your beads are on the string, center them as best as you can. Next, use the tapestry needle as an awl to add a single knot at each end of the bead pattern. To do this, tie a loose knot close to the end of the bead pattern, place the tapestry needle in the center of the knot, move the knot close to the beads, pull it tight with the needle still in, and, finally, remove the needle and give one last tug. Repeat on the other side.

STEP 5: Add a square knot closure
Before creating your first square knot, you’ll want to prep your strings. Take the ends of your bracelet and lay one on top of the other going in opposite directions so that you’ll be able to pull both ends to adjust. Use small pieces of washi tape to temporarily tape your adjustable ends in place at the top and at the bottom. This will keep all your strings in place for adding your square knot closure.

Now it’s time to start your square knots! Take the second piece of 12” cord you set aside, slide it under the adjustable strings and even out the scrap string so it’s the same length on both sides.
To begin your first square knot, lay the left strand of your scrap string horizontally over the center strings. Then place the right string on top of the horizontal string.
Next, feed the right string under the center strings and pull it out through the loop that formed on the left side. Pull evenly on both the right and left strings to tighten. This is one half of your first square knot.
To complete your first square knot, repeat the steps above but this time on the opposite side: right string lays horizontally over center strands. Left string then goes on top of the horizontal string, then under the center strands, and finally out through the loop on the right. Pull evenly on both strands to tighten.

Repeat the square knot process, making sure to always alternate sides as you go. You’ll stop when you can count 6-7 vertical notches on each side of your closure.

To neatly finish the adjustable closure, you’ll need your tapestry needle to thread the loose ends into the knots of the closure. To do this, start by using your tapestry needle to loosen the last 2-3 knots. Next, push your unthreaded needle under the horizontal portion of the loosened knots, leaving the eye of the needle exposed. Thread the eye of your needle with one or both loose ends, then pull the thread or threads through. Repeat if you only pulled one through at a time.

Once both are through, pull the ends tight to tighten the formerly loose square knots and secure the ends in place. Trim the ends close to the adjustable closure and lightly singe the cut ends with a lighter to finish.

STEP 6: Add spacer beads to the ends of the pull strings
Use your bead needle to thread a spacer bead to the end of each pull string. Tie a double knot after each bead to secure it in place, trim the excess cord, and singe the ends of the cord with a lighter to finish.

There are so many fun pattern possibilities using colorful vinyl beads, playful letters, freshwater pearls, and spacer beads. Create a varied assortment for a coordinated stack or create a trio of matching bracelets to share with friends!

You can find this limited edition DIY Kit with The Neon Tea Party here in the shop! Snag your kit now before they’re sold out. And as always: leave any questions in the comments below, be sure to tag @theneonteaparty and @womanshopsworld on Instagram so we can see what you’re creating, and HAPPY CRAFTING!!
Namaste,
Carter


Leave a comment