How to DIY Elastic Bracelets for Kids (& Kids at Heart)
When your kids have colored all the pages, used all of the paint, and are bored of playing outside, it's time for a fun new activity.
We've provided lots of adults with beaded bracelet kits, so we decided it would be fun to put together something for the little ones too!
Making elastic beaded bracelets is not only fun, it's great for strengthening finger dexterity, as well as hand-eye coordination. And your little ones will love that they get to wear their creations, or share them with family and friends.
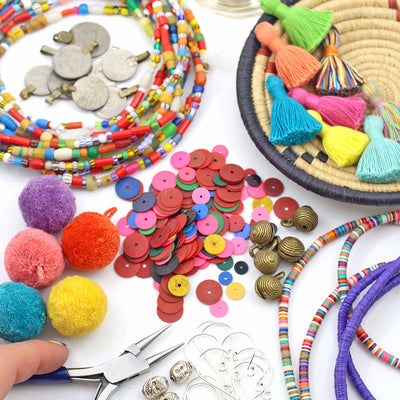
With our Kids DIY Bracelet kit, you'll get everything that you need to make 6+ kids-sized bracelets.
The size of the bracelets will vary depending on the size of your child's wrist, but 6" is a good average length.
To see a video of the making of a similar-style bracelet for adults, please visit this blog.
Here are the step-by-step instructions.
Please note that your child will need some help preparing the elastic, with the tying of the knot and glue application at the end, and possibly when adding the tassel.
1. Decide on a color pattern for your beads if you want a pattern. Also decide if you want your bracelet to say something.
2. Once you've got your pattern planned out, cut a piece of elastic about 9" long. This should give you plenty of room to work.
Parent/Helper Tip: I like to put a piece of scotch tape or washi tape on the end of my elastic so that the beads don't spill off the end. This is especially helpful for little hands!
3. Start stringing your beads. If your bracelet is going to have letters, sometimes it's easiest to start stringing the letters first so that you're sure to have room for them. It's helpful to measure every so often to see where I am in the length of the bracelet, so that if I'm adding letters, I know when to add them.
6" seems to be a good average length for little wrists. You can wrap a string around your child's wrist and them measure that against a ruler to get an exact measurement. 
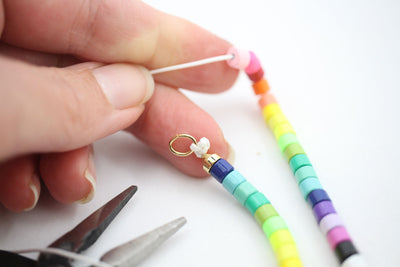
4. Once you have strung on all of your beads, add the tassel if you have one. The easiest way to do this is to slide the needle threader through the loop on the top of the tassel, then put the elastic through the loop in the threader. 
Pull the threader back through the tassel loop, and voila! The elastic is now threaded through the tassel.
5. Check to make sure that your bracelet will fit you. You want it to be comfortably snug, as it's elastic. Once you've confirmed the length, it's time to tie the knot. Make sure you have your glue handy.
I like to tie a standard square knot. To do this, take the right side of elastic and loop it over the left side, and pull it underneath. Repeat the same step with the left side. So the knot should go right over left, then left over right.
When you are ready to tighten the knot, stretch the beads tight, so that the knot will sit snuggly. 
Parent/Helper Time: Grab your tube of G.S. Hypo Cement and put a dot of glue on the knot. I love this glue because it's sturdy, but it also has a needle applicator, so it's easy to get it in tiny spots just where you need it. I like to let my glue dry a bit before I trim off the elastic ends.
Once the glue dries, trim the excess elastic.
You're ready to put on your new bracelet! And you've got enough beads to repeat this about 6 times!
You can purchase our DIY Kids Bracelet kit below.


Leave a comment